×
- Hello
- Login or Register
- Quick Links
- Live Chat
- Track Order
- Parts Availability
- RMA
- Help Center
- Contact Us
- Shop for
- BMW Parts
- BMW Accessories
My Garage
My Account
Cart
Genuine BMW 328i Hood Cable
Hood Release Cable- Select Vehicle by Model
- Select Vehicle by VIN
Select Vehicle by Model
orSeries
Model
Year
Select Vehicle by VIN
For the most accurate results, select vehicle by your VIN (Vehicle Identification Number).
8 Hood Cables found


BMW 328i Rear Bowden Cable
Part Number: 51237201904$25.43 MSRP: $33.68You Save: $8.25 (25%)Ships in 1-3 Business Days


BMW 328i Rear Bowden Cable
Part Number: 51237411315$28.27 MSRP: $37.44You Save: $9.17 (25%)Ships in 1 Business Day


BMW 328i Rear Bowden Cable
Part Number: 51237239240$28.27 MSRP: $37.44You Save: $9.17 (25%)Ships in 1 Business Day


BMW 328i Rear Bowden Cable
Part Number: 51237313782$28.27 MSRP: $37.44You Save: $9.17 (25%)Ships in 1-2 Business Days


BMW 328i Bowden Cable
Part Number: 51231977391$28.95 MSRP: $32.56You Save: $3.61 (12%)Ships in 1-3 Business Days


BMW 328i Rear Bowden Cable
Part Number: 51237396161$28.27 MSRP: $37.44You Save: $9.17 (25%)Ships in 1-3 Business DaysBMW 328i Rear Bowden Cable
Part Number: 51237239239$28.27 MSRP: $37.44You Save: $9.17 (25%)Ships in 1-3 Business Days

BMW 328i Centre Bowden Cable
Part Number: 51238208630$20.55 MSRP: $23.11You Save: $2.56 (12%)Ships in 1-3 Business Days
BMW 328i Hood Cable
If you are looking for OEM BMW 328i Hood Cable, we highly recommend to shop with us. Not only do we offer budget friendly prices, but we also provide fast delivery. In addition, we have a hassle-free return policy on all genuine BMW 328i Hood Cable that come backed by the manufacturer's warranty.
BMW 328i Hood Cable Parts Questions & Experts Answers
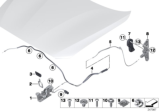
- Q: How to remove and install the hood cable and hood latch on the BMW 328i?A:To remove the clamps, the fastenings holding the connection housing to the inner fender should first be taken off. Pry open the housing and disconnect the inner and outer cables. After that, get rid of rubber sealing strip by removing mounting bolts at top edge of bumper. Create alignment marks for latch and radiator support panel during installation. The latch mounting bolts can be loosened or removed so that they lift from radiator support panel thus releasing outer and inner cables from it. For F-series chassis models, you will need several screws on each side to be removed. For latches to be installed, locate hood release inner cable in the latch then reconnect outer cable with lever again. First seat latch properly on radiator support panel aligning it according to pre-removal markers made earlier. Put in place and tighten every bolt securely before completion of this task. Ensure smooth functioning of latch as well as proper hood closing or opening mechanism after securing all these nuts and bolts properly because once everything works fine; fix bumper bolts back into their positions again. Starting with three sections of hood release cable will help you remove it easily. Remove driver's knee bolster panel (along with hood release handle/kick panel) and A-pillar release lever assembly from driver's side area next time we get access there). Take out left/right plastic covers located behind strut tower while also releasing upper part for cabin air filter housing near them too then pull down lower half but remember engage clips slowly till they can't go any further outwards which means pushing forward all remaining sides at once except front piece must stay up until entire lid comes away including both sections held together by four prongs sticking out opposite ends respectively such that one goes inside other when pushed against floor entirely leaving no room therein whatsoever hence always remember match corresponding arrowheads either side as well while lifting up towards yourself) whereupon bottommost unit should slide downwards alongside wall without coming loose its position between two neighboring slits provided specifically over these walls only thus making sure that no other part gets dislocated during this operation before pushing outermost retainer back into place above them once everything has been properly inserted while ensuring there isn't any gap left between their edges then taking hold innermost clip pliers (fig. 1) released it too farther towards end more space becomes available above resulting greater flexibility due presence now large number slots accommodating various sizes similar manner pull wire outwards until relief appears turn handle counter-clockwise thus disconnecting from rest because otherwise you won't be able either raise or lower as required hence causing another problem involving lack thereof proper drainage system besides which mustn't forget check whether such connections still functioning well despite having suffered wear tear throughout years without ever repairing anything since tend worsen considerably unless addressed soonest possible time; and finally after completion, close entire bonnet firmly shouting loudly indicating again how serious matter involved just happened before one goes elsewhere avoiding making same mistakes twice especially during moments when nobody else around except oneself like me of course! The last step is installing the cable by replacing it in its correct path and securing it with all relevant retaining clips. As long as the hood latch performs properly prior to shut down, one may carefully close hood.


