×
- Hello
- Login or Register
- Quick Links
- Live Chat
- Track Order
- Parts Availability
- RMA
- Help Center
- Contact Us
- Shop for
- BMW Parts
- BMW Accessories
My Garage
My Account
Cart
Genuine BMW Z4 A/C Expansion Valve
Air Conditioning Expansion Valve- Select Vehicle by Model
- Select Vehicle by VIN
Select Vehicle by Model
orSeries
Model
Year
Select Vehicle by VIN
For the most accurate results, select vehicle by your VIN (Vehicle Identification Number).
3 A/C Expansion Valves found


BMW Z4 Expansion Valve
Part Number: 64116994989$173.53 MSRP: $237.60You Save: $64.07 (27%)Ships in 1-3 Business Days
BMW Z4 Expansion Valve
Part Number: 64116929991$192.54 MSRP: $233.50You Save: $40.96 (18%)Ships in 1-3 Business Days
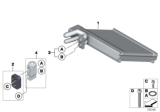
BMW Z4 Expansion Valve
Part Number: 64119210754$165.27 MSRP: $226.29You Save: $61.02 (27%)Ships in 1-3 Business Days
BMW Z4 A/C Expansion Valve
The A/C Expansion Valve also known as Thermostat in BMW Z4 cars demerge the hot and hiOG cold refrigerant from the compressor that is needed by the AC evaporator to absorb the heat to cool the cabin. Due to the task of regulating the amount of refrigerant allowed into the system at a stipulated rate, the A/C Expansion Valve plays a critical role in maintaining that efficiency when in use as well as a proper working order of the whole system. That is why, depending on the Z4 model produced, it could use different types of A/C Expansion Valves each possessing specific mechanisms and capabilities. Knowing the certain type of A/C Expansion Valve of your BMW Z4 can assist in keeping ideal the maintenance and effectiveness of your vehicle's air con system.
If you are looking for OEM BMW Z4 A/C Expansion Valve, we highly recommend to shop with us. Not only do we offer budget friendly prices, but we also provide fast delivery. In addition, we have a hassle-free return policy on all genuine BMW Z4 A/C Expansion Valve that come backed by the manufacturer's warranty.
BMW Z4 A/C Expansion Valve Parts Questions & Experts Answers
- Q: How to replace the A/C Accumulator, A/C Compressor, A/C Condenser, A/C Evaporator Core, A/C Expansion Valve and HVAC Pressure Switches on BMW Z4?A:Before dealing with Z4 models, you must have an experienced BMW dealer or specialist service remove the refrigerant. First strip away the heater assembly, and then remove the adapter plate attached to the heater assembly. Unhook the cover retainers from the evaporator, then unscrew the upper cover screw and take out its holding clips before you remove the whole top cover. Free the evaporator by unscrewing mounting screws on both ends, then lift it away from the heater assembly. Renewing your vehicle goes back by the steps used to install, fixing any refrigerant shortages and filling up the coolant tank. Be sure to empty the remaining refrigerant from the engine before you can unscrew the connecting bolts from the line fittings and place where the hoses attach to the firewall. Unplug the air conditioning tubes, adapter plate, and steer the rubber seal inside the firewall outside. Unscrew expansion valve mounting bolts, put fresh seals and grommet in place, and reinstall everything backwards. You need to replace the receiver/drier when any of these conditions happen: the system is dirty, the compressor or coils have been worked on recently, there's been a leak, or the system has stayed open for more than 24 hours. Disconnect the refrigerant, undo the clamps on the retaining screws, and lift the attached pipes and connections straight up from the top of the receiver/drier, throwing away the O-ring seals. After one hour without connection, block off any openings. You don't need to take off the fender liner on Z4 models to find your receiver drier. Loosen the clamp screws to take down the receiver/drier, follow the same steps to reattach it, making sure you recharge the refrigerant system. Before work on compressor and lines, prepare by pushing down the clutch lever, channeling any refrigerant exhaust into a container, and tieing down the vehicle. Take out the front splash shield to expose the compressor belt. Disconnect the fluid filling tube on the front windshield wiper, remove the compressor electrical wires, then unscrew and pull on the air conditioning lines while discarding the worn O-ring seals. To install the compressor, take off its mounting bolts and compressor, and return everything by working in reverse order when you're done. Make sure to put the proper level of refrigerant oil in, and put in new seals. To take out the pressure sensor above the receiver/drier, you have to run the system dry of refrigerant, unplug the wiring, loosen the sensor bolt, do the reverse process, and finish with a refrigerant refill. First, empty the refrigerant from the condenser, take off the air filter unit, and the radiator. You should first disconnect the refrigerant lines, then remove the screws holding the condenser by the base, and lift the whole thing away. Reinstallation proceeds backward, adding exactly the right amount of oil and putting fresh seals in their place. Take out the blower limit switch by unscrewing the bracket, separating the arm from the servo, removing the right-hand footwell air duct, and unscrewing the servo motor. Follow this sequence to remove the blower limit switch - disconnect wiring, remove screws, push back a clip, take out the switch, do reverse steps to reinstall.

Related BMW Z4 Parts
 BMW Z4 A/C Compressor
 BMW Z4 Blower Motor Resistor
 BMW Z4 Blower Motor
 BMW Z4 A/C Switch
 BMW Z4 A/C Idler Pulley
 BMW Z4 A/C Condenser Fan
Browse by Year
2025 A/C Expansion Valve 2024 A/C Expansion Valve 2023 A/C Expansion Valve 2022 A/C Expansion Valve 2021 A/C Expansion Valve 2020 A/C Expansion Valve 2019 A/C Expansion Valve 2016 A/C Expansion Valve 2015 A/C Expansion Valve 2014 A/C Expansion Valve 2013 A/C Expansion Valve 2012 A/C Expansion Valve 2011 A/C Expansion Valve 2010 A/C Expansion Valve 2009 A/C Expansion Valve 2008 A/C Expansion Valve 2007 A/C Expansion Valve 2006 A/C Expansion Valve 2005 A/C Expansion Valve 2004 A/C Expansion Valve 2003 A/C Expansion Valve