×
- Hello
- Login or Register
- Quick Links
- Live Chat
- Track Order
- Parts Availability
- RMA
- Help Center
- Contact Us
- Shop for
- BMW Parts
- BMW Accessories
My Garage
My Account
Cart
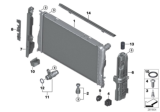
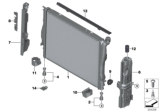
Genuine BMW Z4 Radiator
Cooling Radiator- Select Vehicle by Model
- Select Vehicle by VIN
Select Vehicle by Model
orSeries
Model
Year
Select Vehicle by VIN
For the most accurate results, select vehicle by your VIN (Vehicle Identification Number).
10 Radiators found


BMW Z4 Radiator
Part Number: 17117547059$356.78 MSRP: $526.66You Save: $169.88 (33%)Ships in 1-3 Business Days

BMW Z4 Radiator
Part Number: 17117562079$356.78 MSRP: $526.66You Save: $169.88 (33%)Ships in 1-3 Business Days

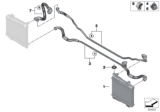
BMW Z4 REMOTE RADIATOR
Part Number: 17118672237$249.74 MSRP: $368.66You Save: $118.92 (33%)Ships in 1-3 Business Days


BMW Z4 Engine Cooling Radiator
Part Number: 17119071517$364.67 MSRP: $487.84You Save: $123.17 (26%)Ships in 1-3 Business Days
BMW Z4 Radiator
Part Number: 17119071518$364.67 MSRP: $487.84You Save: $123.17 (26%)Ships in 1-3 Business Days

BMW Z4 Radiator
Part Number: 17117551635$560.98 MSRP: $756.94You Save: $195.96 (26%)Ships in 1-3 Business DaysBMW Z4 Radiator
Part Number: 17117559273$356.78 MSRP: $526.66You Save: $169.88 (33%)Ships in 1-3 Business Days

BMW Z4 Radiator
Part Number: 17118666811$374.60 MSRP: $552.97You Save: $178.37 (33%)Ships in 1-3 Business Days
BMW Z4 Radiator
Part Number: 17117558480$356.78 MSRP: $526.66You Save: $169.88 (33%)Ships in 1-3 Business Days
BMW Z4 Radiator
Part Number: 17118666739$416.23 MSRP: $614.41You Save: $198.18 (33%)Ships in 1-3 Business Days
BMW Z4 Radiator
The BMW Z4 Radiator is one of the under vehicle components performing a very important role of cooling the engines by removing heat from it and transferring it to the surrounding atmosphere. Aluminum is generally used in the production of the radiator, which has a main portion with fins/tubes and inlet/outlet tanks. The first type of heat transfer is the passing of the coolant through the core tubes as the fins draw heat from the coolant and releases it to the atmosphere. An automobile radiator can develop leakage and be effectively recoiled by brazing, soldering or welding, the best method of preservation entails replacement of the radiator. OEM performance radiators called Lightweight aluminum, have better heat transfer than the factory units, with better construction of the units of the core design to allow better circulation of the coolant and more surface area for heat exchange. These radiators have direct fit models that can quick and easy to install and can be bought for various application including those for drag racing and custom cars.
If you are looking for OEM BMW Z4 Radiator, we highly recommend to shop with us. Not only do we offer budget friendly prices, but we also provide fast delivery. In addition, we have a hassle-free return policy on all genuine BMW Z4 Radiator that come backed by the manufacturer's warranty.
BMW Z4 Radiator Parts Questions & Experts Answers
- Q: How to remove and install a radiator on BMW Z4?A:Some models are equipped with a specialized radiator designed to consume ground level ozone. Do not replace the radiator with a radiator not equipped with this special coating. Disconnect the cable from the negative terminal of the battery. Drain the cooling system. Remove the air filter housing. On automatic transmission models, remove the cooling fan and viscous coupling. On manual transmission models, remove the electric cooling fan. Pry out the locking wire clips and disconnect the upper coolant hose union from the radiator and expansion tank. Pry out the locking wire clip and disconnect the hose from the expansion tank. Pry out the locking wire clip and disconnect the lower hose from the expansion tank. Reach underneath the expansion tank and disconnect the wiring from the coolant level sensor. Pull out the retaining clip from the base of the expansion tank. Pull the expansion tank away from the radiator and lift it up off the brackets located at the bottom of the radiator and remove it. Disconnect the transmission fluid cooler lines from the external transmission cooler, if equipped. Depending on the model, remove the Torx screw at the upper right corner of the radiator, the plastic rivet at the upper left corner, or the plastic bolts at the top of the radiator, then lift the radiator upwards and out of the engine compartment. If the radiator has been removed due to suspected blockage, reverse flush it. Clean dirt and debris from the radiator fins, using an air line or a soft brush. If necessary, a radiator specialist can perform a flow test on the radiator, to establish whether an internal blockage exists. A leaking radiator must be referred to a specialist for permanent repair. Do not attempt to weld or solder a leaking radiator, as damage may result. Inspect the radiator lower rubber mounts for signs of damage or deterioration and replace if necessary. Installation is the reverse of removal, noting the following points. Ensure that the lower mount bushings are correctly located in the body, then lower the radiator into position, engage it with the mounts and secure it in position with the retaining bolts/clip. Ensure that the fan cowl is correctly located with the Jugs on the radiator and secure it in position with the clips. Reconnect the hoses and ensure the retaining clips engage securely. Check the condition of the O-ring seals in the end of the radiator fittings. Replace any that are defective. On completion, reconnect the battery and refill the cooling system.

Related BMW Z4 Parts
 BMW Z4 Water Pump
 BMW Z4 Cooling Hose
 BMW Z4 Radiator Hose
 BMW Z4 Coolant Reservoir
 BMW Z4 Fan Shroud
 BMW Z4 Fan Blade
 BMW Z4 Radiator Cap
 BMW Z4 Radiator fan