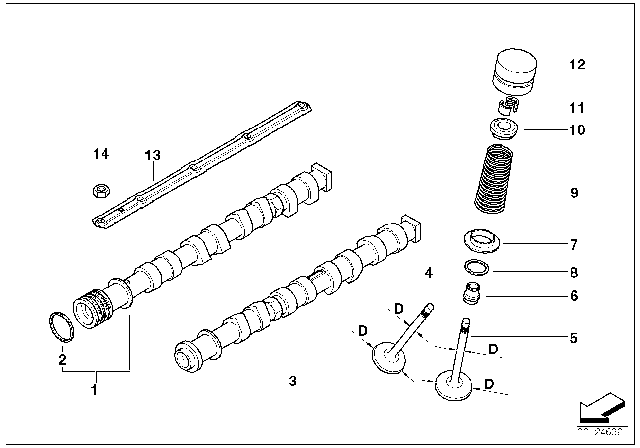
Special BMW service tools are required to remove and install the camshafts and VANOS units, and it is essential to read the entire procedure before starting the job to avoid engine damage from improperly timed camshafts. Begin by disconnecting the negative cable from the battery, ensuring to follow battery disconnection cautions. Remove the air intake hood above the radiator and the air filter housing, followed by the viscous clutch cooling fan and fan shroud, noting that the radiator cooling fan nut has left-hand threads. Proceed to remove engine covers and the cylinder head cover, then the spark plugs, plugging the spark plug bores to prevent debris from entering the engine. Remove the VANOS unit and the primary camshaft chain tensioner cylinder, taking care as the chain tensioner piston is under spring pressure. Lock the secondary chain tensioner in place, remove the exhaust camshaft impulse wheel mounting nuts and the impulse wheel, then the spring plate, followed by the intake camshaft sprocket mounting nuts and its spring plate. Remove torx bolts from the exhaust camshaft sprocket and lift off both exhaust and intake sprockets along with the secondary chain, thrust spacer, and splined shaft, marking the splined shafts for reinstallation. Remove the exhaust camshaft splined sleeve and shaft, then the secondary chain tensioner mounting bolts, and remove the tensioner with the retaining pin in place. Lift the primary chain sprocket off the exhaust camshaft and remove it from the chain, placing the timing chain on the end of the exhaust camshaft. Remove the locating studs from the intake camshaft and lift off the intake camshaft thrust spacer and impulse wheel, ensuring not to remove spline retaining screws from the camshafts. Note the markings on the camshaft carriers for proper reinstallation. Lift the timing chain and place the exhaust camshaft on its carrier, followed by the intake camshaft on its carrier, and install the bearing caps on the camshafts, securing the retaining nuts finger tight while noting the markings on each bearing cap. Ensure the crankshaft is positioned approximately 30° opposite the direction of engine rotation from TDC before reinstalling the camshafts to prevent piston-to-valve interference. Fit the special tools to the cylinder head and align the tensioning pins with the bearing caps on the intake camshaft, taking care not to overtighten the bolts in the spark plug holes. Rotate the eccentric shaft of the special tool to pretension the bearing caps and torque the bearing cap nuts, then release the tension and remove the special tools, repeating the procedure for the exhaust camshaft. After installing the camshafts, allow a minimum waiting time for the hydraulic lifters to bleed down before returning the crankshaft and pistons to TDC, as the hydraulic lifters may expand and cause increased valve lift, potentially leading to piston-to-valve interference. Use a 27 mm open-end wrench to rotate the camshaft into position, grinding off the outer edges of the wrench jaws if necessary to avoid damaging the cylinder head. Rotate the camshafts until the intake and exhaust lobes for cylinder 1 face each other, securing the camshafts in TDC position with the BMW camshaft TDC tools and locking them down with a special tool bolted to a spark plug bore. Maintain tension on the timing chain while rotating the crankshaft in the direction of rotation until cylinder 1 is at TDC, securing the crankshaft in position with the special tool. Slide the impulse wheel onto the intake camshaft, aligning it with the raised portion, and fit the thrust spacer, tightening it down with the threaded locating studs. Install the primary sprocket onto the primary timing chain and exhaust camshaft, ensuring the pointer on the sprocket aligns with the cylinder head sealing surface. Insert the adjustable primary chain tensioner tool into the timing chain tensioner bore and tighten until slack is removed, but do not pretension the timing chain, ensuring the arrow on the upper primary sprocket aligns with the upper edge of the cylinder head. Install the secondary chain tensioner on the cylinder head, keeping it compressed with the special tool, and install the exhaust camshaft splined sleeve, ensuring the gap aligns with the corresponding gap in the camshaft splines. Slide the splined shaft onto the exhaust camshaft, ensuring the locating tooth fits into the spline gaps, and push it in further to center the threaded holes in the primary chain sprocket. Position the intake and exhaust sprockets in the special tool, aligning the spline gap on the intake sprocket, and slide the sprockets onto the camshafts, confirming the alignment of the intake sprocket splines. Avoid altering the position of the sprockets with respect to the chain when removing from the tool. Align the locating tooth of the splined shaft with the gaps on the camshaft and sprocket, sliding it onto the intake camshaft until approximately 1 mm of splines are visible. Install the intake camshaft spring plate with the FRONT mark visible, followed by the mounting nuts finger tight. Insert the sprocket mounting bolts on the exhaust side camshaft assembly, initially tightening to approximately 5 Nm and then backing off by half a turn. Fit the thrust spacer on the exhaust camshaft and install the spring plate, ensuring the F mark is visible. Install the exhaust camshaft impulse wheel, aligning the pointer with the top edge of the cylinder head, and install the mounting nuts finger tight. Pull out the exhaust camshaft splined shaft to stop, press down on the secondary chain tensioner, and remove the tensioner lock-down tool. Preload the primary chain by tightening the adjusting screw on the special tool to the specified torque, and preload the exhaust camshaft spring plate by pressing on the impulse wheel while tightening the mounting nuts finger tight. Install the VANOS setup bracket to the front of the cylinder head timing case, securing the nuts finger tight and then uniformly tightening until the tool is in full contact with the cylinder head. Ensure that gasket material is removed from the face of the cylinder head and that the sealing face is clean and free of oil to prevent incorrect camshaft timing. Remove the crankshaft locking tool and the camshaft locking tools, then turn the engine over twice in the direction of rotation until the cylinder 1 intake and exhaust camshaft lobes face each other. Secure the crankshaft in TDC position with the special tool and measure clearances using the camshaft tool set, noting that the intake side may be up to 1 mm above the surface of the cylinder head, which is normal. Reassemble the engine, resetting camshaft timing if necessary, and reinstall the VANOS unit before removing the locking tools and ensuring the cooling system is topped off and bled.
Posted by BMWPartsDeal Specialist 


