Contact Us Live Chat or 1-888-580-1680
My Garage
My Account
Cart
Make sure this part fits

BMW 11311432177 Upper Engine Timing Chain

1991-2006 BMW 11-31-1-432-177

Customer Questions & Expert Answers (12)
BMW 11311432177 Upper Engine Timing Chain
  • Part Description
    Timing Chain
  • Position
    Upper
  • Replaces
    11-31-1-730-188
  • Manufacturer
    BMW
Make sure this part fits
$36.78 MSRP: $55.93
You Save: $19.15 (35%)
Ships in 1-3 Business Days
1
ADD TO CART
  • Related Parts
  • Product Specifications
  • Vehicle Fitment
  • Customer Questions & Expert Answers
  • Product Specifications

    BrandGenuine BMW
    Manufacturer Part Number11311432177
    Part DescriptionTiming Chain
    Other NamesCamshaft Chain
    Item Dimensions9.1 x 6.1 x 2.1 inches
    Item Weight1.30 Pounds
    PositionUpper
    ConditionNew
    Fitment TypeDirect Replacement
    Replaces11-31-1-730-188
    ManufacturerBMW
    SKU11311432177
    WarrantyThis genuine BMW part is guaranteed by BMW's factory warranty.
    Shipping & ReturnShipping Policy Return Policy
    Warning: California’s Proposition 65
  • Vehicle Fitment

    Year Make Model Submodel
    2001-2005, 1993-1995 BMW 320iSedan(E36), Sedan(E46)
    2000 BMW 323CiConvertible(E46), Coupe(E46)
    1998-2000 BMW 323iConvertible(E36), Sedan(E46), Wagon(E46)
    1998-1999 BMW 323isCoupe(E36)
    2001-2006 BMW 325CiConvertible(E46), Coupe M54 Engine(E46), Coupe M56 Engine(E46), Coupe(E46)
    2001-2005, 1992-1995 BMW 325iConvertible(E36), Sedan M54 Engine(E46), Sedan M56 Engine(E46), Sedan(E36), Sedan(E46), Wagon M54 Engine(E46), Wagon M56 Engine(E46), Wagon(E46)
    1991-1995 BMW 325isCoupe(E36)
    2001-2005 BMW 325xiSedan(E46), Wagon(E46)
    2000 BMW 328CiCoupe(E46)
    1996-2000 BMW 328iConvertible(E36), Sedan(E36), Sedan(E46)
    View More
  • Customer Questions & Expert Answers

    Q:
    Does PN fit the VIN? Posted by BMWPartsDeal Specialist
    A:
    You can Select Your Vehicle to check if 11311432177 fits your vehicle.
    Posted by BMWPartsDeal Specialist
    Q:
    What are the key components and procedures involved in servicing and repairing the camshaft timing chain on BMW X5? Posted by Customer
    A:
    The 6-cylinder (M54) engine utilizes a pair of chains to drive the camshafts, with a primary chain connected to the crankshaft that drives the primary sprocket on the exhaust camshaft, while the secondary chain drives the intake camshaft. Each chain is tensioned by a hydraulic tensioner. The timing for both intake and exhaust camshafts is variable and managed by the engine control module (ECM) through a system known as double VANOS. Service and repair of the camshaft timing chain necessitate the removal of the front crankshaft vibration damper, double VANOS unit, engine oil pan, and timing chain housing cover, so it is important to thoroughly review the procedures before beginning any work.
    Posted by BMWPartsDeal Specialist
    Q:
    What are the removal and install Timing Chain and Timing Cover procedures for various engines on BMW Z3? Posted by Customer
    A:
    Disconnect the negative battery cable and drain the cooling system through the bottom of the radiator. Remove the radiator and fan. Disconnect all electrical plugs, remove the attaching nuts, and remove the air cleaner and airflow sensor. Note and mark the wiring connections, then disconnect all alternator wiring. Unbolt the alternator, remove it and the drive belt. Unbolt the power steering pump, remove the belt, and move the pump aside, ensuring the hoses are not stressed. Remove the 3 bolts from the bottom of the bell housing and the 2 bolts below it which fasten the reinforcement plate. Drain the oil from the lower oil pan, remove the lower pan bolts and the pan. Remove the 3 bolts fastening the bottom of the front cover to the oil pan, loosen the remaining oil pan bolts for slight separation. Remove the water pump, the center bolt, and use a puller to remove the crankshaft pulley. Remove the piston for the timing chain tensioner. Remove the bolts attaching the top of the front cover to the cylinder head, then remove all the bolts fastening the cover to the block. Separate the upper surface of the oil pan gasket and the lower surface of the front cover with a sharp tool, replacing the gasket if damaged. Remove the distributor cap, rotor, rotor adapter, distributor housing, and the intake camshaft end cover. Remove the socket head bolts holding the upper timing chain guide, turn the engine to TDC of cylinder number 1, and keep it in this position. Remove the timing tensioner piston, unfold the sprocket bolt lock plate, remove the sprocket bolts and sprockets. Remove the 2 snap rings for the guide rail on the left side of the engine and pull the guide rail forward to free it from the chain.To install, place the timing chain and guide rail, install the guide rail snap rings, and place the chain around the lower sprocket. Engage the chain with the intake side sprocket with aligned marks, turn the intake sprocket opposite to normal rotation to tension the chain, and bolt the sprocket and lock plates onto the intake camshaft. Prevent the camshaft from rotating and torque the bolts to 6-7 ft. lbs. Engage the timing marks with the exhaust side sprocket, install the sprocket and lock plates onto the exhaust camshaft, use the distributor rotor adapter to prevent sprocket movement, and torque the bolts to 6-7 ft. lbs. Slide the chain tensioner piston into its cylinder with a new seal, install the spring with the conical end out, and the cap that retains the spring. Add oil to the tensioner rail contact well, loosen the nipple on the plug and add oil until it runs out of the nipple, then close the nipple and torque the cap to 29 ft. lbs. Turn the engine 1 revolution, recheck the timing, install the upper timing chain guide, and adjust the guide to center the chain. Before reinstalling the cover, file off flashing at the top/rear of the casting, replace all gaskets with silicone sealer, trimming off excess gasket ends. Slide the cover on, install all bolts in proper positions, coat the 3 bolts fastening the front cover to the upper oil pan with sealant. Tighten the top bolts fastening the lower cover to the upper cover first, then the remaining front cover bolts, and finally the oil pan bolts to 7 ft. lbs. Inspect sealing O-rings, replace as necessary, and ensure the DME distributor bolt has its seal and is installed with a sealer. Torque the oil drain plug to 24 ft. lbs., and both upper and lower oil pan bolts to 7 ft. lbs. Reverse the remaining portions of the removal procedures, ensuring to fill and bleed the cooling system and refill the oil pan with the correct oil.
    Posted by BMWPartsDeal Specialist
    Q:
    How do you remove and install the secondary timing chain on BMW Z4? Posted by Customer
    A:
    To remove the secondary chain, put the engine at TDC for cylinder no.1 and unbolt the VANOS adjustment unit. Remove the timing chain tensioner plunger from the right-hand side of the engine with the aid of a nut screwing on the opposite side, and discard the sealing ring because there is a strong spring attached to it. If reusing the tensioner, push and pull the plunger a few times to expel the oil in the chamber. Insert a suitable drill bit into the trolley of the secondary chain tensioner to lock the plunger, and then remove the camshaft position sensor wheel from the exhaust camshaft sprocket and the plate spring. Thirdly, take off three intake camshaft sprocket nuts and a corrugated washer, and then the three screws of the exhaust camshaft sprocket; lift the secondary chain together with the sprockets, the friction washer and the intake camshaft splined shaft and set it in the order for assembly. Check the chain for pre-determined wear, if the sprockets are worn or the chain has too much side- way movement or making noises, change it. The sprocket teeth must be worn flat or hooked and the chain guide and tensioner contact surfaces should be worn. During installation, make certain the Number 1 piston is at Top Dead Centre (TDC) with the crankshaft locked and verify the position of the camshafts. Insert the special tool into one of the primary tensioner holes and turn the screw until it lightly comes against the tensioning rail. Through the use of the special tool or by positioning the sprockets in a manner that there are 15 chain pins within the cutouts. Place in the chain and sprockets above the camshafts, making sure it fits correctly and put the splined shaft back into the intake camshaft. Replace the corrugated washer and the retaining nuts with a torque specified on each nut dimension in the assembly. This particular exhaust sprocket screw must be tightened up to 44 inch pounds, and then it must be loosened up by turning it counter clockwise 180 degrees. There is friction washer and plate spring fitted with the F mark facing forward; there is also the exhaust camshaft position sensor wheel to be reinstated, the nuts tightened by hand. Remove the exhaust splined shaft, pinch the secondary chain tensioner plunger, unlock the pin. Twist the adjusting screw on the special tool and operate until all possible movement is eliminated. With the help of a special tool, set the splined shafts and sprockets with screw-in pins and nuts gradually and evenly tightening to the max. torque stated. Turn the crankshaft two full revolutions and check the position of the camshafts in relation to the locking tools so that the timing is correct. Last of all, take out the centering tool and refit the VANOS adjustment unit. For the primary chain unscrew the splined shaft and the sleeve with the exhaust camshaft sprocket together with the secondary timing chain, secondary chain tensioner and the three screwed pins in the exhaust sprocket. Let the timing chain be free and slide and then take off the timing chain cover so that you note the way it passes around the crankshaft sprocket to get detached from the later. Delocate the tensioner rail and chain guide after twisting the cline retainer clips. That is for installation; ensure that Number 1 piston is at TDC, engage the chain with the crankshaft sprocket, and re-fit the chain guide and tensioner rail with correct routing. Line up the timing arrow on the exhaust camshaft sprocket with the upper edge of the cylinder head; fit the sprocket; replace the timing chain cover. Slide the special tool to the tensioner aperture, tighten the screw and check on the sprocket timing. Plug in the exhaust sprocket the screw-in pins further, replace the secondary timing chain tensioner and fasten the bolts. Last but not least, place back the splined shaft and sleeve to the exhaust camshaft sprocket in proper orientation and apply pressure to push the splined shaft in in a way such that the threaded holes are aligned with the oval apertures in the tooth sleeve in reference to accomplishing the secondary timing chain installation.
    Posted by BMWPartsDeal Specialist
    Q:
    What are the removal and install Timing Chain and Timing Cover procedures on BMW M3? Posted by Customer
    A:
    Disconnect the negative battery cable and drain the cooling system through the bottom of the radiator. Remove the radiator and fan. Disconnect all electrical plugs, remove the attaching nuts, and remove the air cleaner and airflow sensor. Note and mark the wiring connections, then disconnect all alternator wiring. Unbolt the alternator, remove it and the drive belt. Unbolt the power steering pump, remove the belt, and move the pump aside, ensuring the hoses are not stressed. Remove the 3 bolts from the bottom of the bell housing and the 2 bolts below it which fasten the reinforcement plate. Drain the oil from the lower oil pan, remove the lower pan bolts and the pan. Remove the 3 bolts fastening the bottom of the front cover to the oil pan, loosen the remaining oil pan bolts for slight separation. Remove the water pump, the center bolt, and use a puller to remove the crankshaft pulley. Remove the piston for the timing chain tensioner. Remove the bolts attaching the top of the front cover to the cylinder head, then remove all the bolts fastening the cover to the block. Separate the upper surface of the oil pan gasket and the lower surface of the front cover with a sharp tool, replacing the gasket if damaged. Remove the distributor cap, rotor, rotor adapter, distributor housing, and the intake camshaft end cover. Remove the socket head bolts holding the upper timing chain guide, turn the engine to TDC of cylinder number 1, and keep it in this position. Remove the timing tensioner piston, unfold the sprocket bolt lock plate, remove the sprocket bolts and sprockets. Remove the 2 snap rings for the guide rail on the left side of the engine and pull the guide rail forward to free it from the chain.To install, place the timing chain and guide rail, install the guide rail snap rings, and place the chain around the lower sprocket. Engage the chain with the intake side sprocket with aligned marks, turn the intake sprocket opposite to normal rotation to tension the chain, and bolt the sprocket and lock plates onto the intake camshaft. Prevent the camshaft from rotating and torque the bolts to 6-7 ft. lbs. Engage the timing marks with the exhaust side sprocket, install the sprocket and lock plates onto the exhaust camshaft, use the distributor rotor adapter to prevent sprocket movement, and torque the bolts to 6-7 ft. lbs. Slide the chain tensioner piston into its cylinder with a new seal, install the spring with the conical end out, and the cap that retains the spring. Add oil to the tensioner rail contact well, loosen the nipple on the plug and add oil until it runs out of the nipple, then close the nipple and torque the cap to 29 ft. lbs. Turn the engine 1 revolution, recheck the timing, install the upper timing chain guide, and adjust the guide to center the chain. Before reinstalling the cover, file off flashing at the top/rear of the casting, replace all gaskets with silicone sealer, trimming off excess gasket ends. Slide the cover on, install all bolts in proper positions, coat the 3 bolts fastening the front cover to the upper oil pan with sealant. Tighten the top bolts fastening the lower cover to the upper cover first, then the remaining front cover bolts, and finally the oil pan bolts to 7 ft. lbs. Inspect sealing O-rings, replace as necessary, and ensure the DME distributor bolt has its seal and is installed with a sealer. Torque the oil drain plug to 24 ft. lbs., and both upper and lower oil pan bolts to 7 ft. lbs. Reverse the remaining portions of the removal procedures, ensuring to fill and bleed the cooling system and refill the oil pan with the correct oil.
    Posted by BMWPartsDeal Specialist
    Q:
    How to install and timing the primary and secondary timing chains and camshafts in M54 six cylinder engine on BMW X3? Posted by Customer
    A:
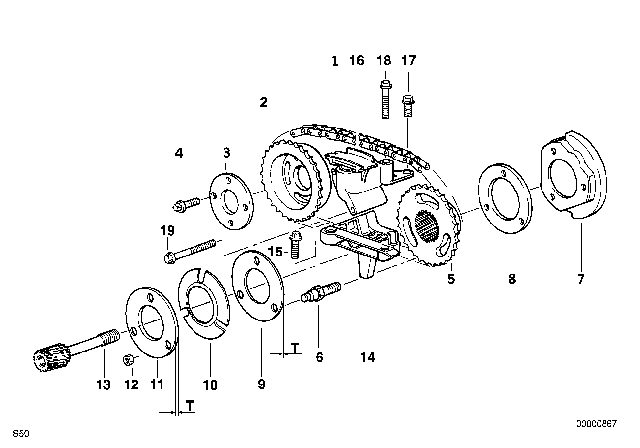
    Ensure camshafts are locked in TDC position using BMW special tool set 113240. Inspect timing chain sprockets, guide rail, and tensioner rail for damage, replacing any worn or damaged parts; if sprockets are replaced due to wear, also replace the chain. Install the primary timing chain to the crankshaft sprocket and hang the upper end from the exhaust camshaft. If necessary, replace the crankshaft front seal in the timing chain cover. To install the lower timing chain cover, clean the sealing surfaces, use new gaskets and a coolant pipe O-ring, remove dowel pins from the engine block, drive dowels into the cover until they slightly protrude, apply a small bead of silicon sealer to the corners where the timing cover meets the cylinder head and engine block, tap the cover into position until firmly seated, install all bolts hand tight including two Torx bolts from above, install the secondary chain lower guide, and tighten cover mounting bolts alternately and in stages. Install the oil pan with a new gasket, reinstall the crankshaft vibration damper, and ensure not to use BMW special tool 115180 to hold the crankshaft stationary when tightening the vibration damper mounting bolt; instead, have a second person hold special tool 118190 while tightening. Remove the crankshaft locking tool. Fit the top sprocket to the primary timing chain and install it on the exhaust camshaft, ensuring the pointer on the sprocket lines up with the cylinder head sealing surface. Position the sprocket so that chain slack is on the tensioner rail side, insert BMW special tool 114220 in the cylinder head, and screw in the adjustment screw until it contacts the tensioning rail and removes chain slack. Ensure the arrow on the upper primary sprocket lines up with the upper edge of the cylinder head, repositioning if necessary. Install and tighten down threaded locating studs in the end of the exhaust camshaft, then install the secondary chain tensioner on the cylinder head while keeping it compressed using BMW special tool 113291 or a suitable pin tool. Fit the exhaust camshaft splined sleeve, aligning the gap in the sleeve splines with the corresponding gap on the camshaft splines, and slide the splined shaft on the exhaust camshaft, ensuring the locating tooth fits into the spline gaps. Push the splined shaft in further to rotate the splined sleeve until the three threaded holes in the primary chain sprocket are centered in the splined sleeve's slots. Time the intake to exhaust sprockets using BMW special tool 116180, position the spline gap on the intake sprocket, and place the secondary chain on the sprockets, ensuring not to alter the position of the sprockets with respect to the chain when removing from the special tool. Slide the splined shaft onto the intake camshaft until approximately 1 mm of splines are visible, install the intake camshaft spring plate with the FRONT mark visible, and install mounting nuts finger tight. Insert sprocket mounting bolts on the exhaust side camshaft assembly, initially tightening to approximately 5 Nm and then backing off by half a turn. Fit the thrust spacer on the exhaust camshaft, install the spring plate ensuring the F mark is visible, and if not, install the spring plate with the convex side facing forward. Install the exhaust camshaft impulse wheel, aligning the pointer with the top edge of the cylinder head, and install mounting nuts finger tight. Pull out the exhaust camshaft splined shaft to stop, press down on the secondary chain tensioner, and remove the tensioner lock-down tool. Preload the primary chain by tightening the adjusting screw on BMW special tool 114220 to the specified torque, and preload the exhaust camshaft spring plate by pressing on the impulse wheel while tightening the mounting nuts finger tight. Install BMW special tool 116150 to the front of the cylinder head timing case, install nuts finger tight, then tighten down uniformly until the special tool is in full contact with the cylinder head. Ensure gasket material is removed from the face of the cylinder head, clean the sealing face, and keep it free of oil. Secure the camshaft sprockets and impulse wheels by tightening mounting screws on the exhaust camshaft impulse wheel to approximately 5 Nm, tightening mounting nuts on exhaust and intake sprocket assemblies to approximately 5 Nm, and torque down mounting screws and nuts to final specifications. Remove the crankshaft locking tool, allowing the crankshaft to no longer be secured in TDC position, and remove camshaft locking tools from the cylinder head. Turn the engine over twice in the direction of rotation until cylinder 1 intake and exhaust camshaft lobes face each other, secure the crankshaft in TDC position with BMW special tool 115180, and place BMW special tool set 113240 over camshafts to measure clearances, noting that due to VANOS unit tolerances, the intake side of the special tool may be up to 1 mm above the surface of the cylinder head, which is normal. Otherwise, reset camshaft timing. Remove BMW special tool 116150 from the front of the cylinder head, reinstall the VANOS unit, remove BMW special tool 114.220, and reinstall the primary chain tensioner. Install the intake camshaft oil baffle, check for correct seating of half-moon seals in the back of the cylinder, and use a small amount of sealant at corners of half-moon cutouts, sealing corners in front of the cylinder head at the VANOS unit. The remainder of assembly is the reverse of removal, ensuring to secure all coolant hoses, thermostat housing, and engine coolant drains, install a new engine oil filter and oil, refill and bleed the cooling system, and use a scan tool to check VANOS operation with the engine idling.
    Posted by BMWPartsDeal Specialist
    Q:
    How is tension maintained on each chain in the M54 engine for the 2008 BMW X3? Posted by Customer
    A:
    Each chain is maintained under tension by a hydraulic tensioner.
    Posted by BMWPartsDeal Specialist
    Q:
    What should be done with the primary camshaft chain tensioner for the 2008 BMW X3? Posted by Customer
    A:
    Remove the primary camshaft chain tensioner from the timing chain cover, taking care with the chain tensioner piston under spring pressure.
    Posted by BMWPartsDeal Specialist
    Q:
    What is the procedure for installing the lower timing chain cover for the 2003 BMW X5? Posted by Customer
    A:
    Clean the sealing surfaces, use new gaskets and a coolant pipe O-ring, remove dowel pins from the engine block, drive dowels into the cover until they slightly protrude, apply a small bead of silicon sealer to the corners where the timing cover meets the cylinder head and engine block, tap the cover into position, install all bolts hand tight, including two Torx bolts from above, install the secondary chain lower guide, and tighten cover mounting bolts alternately and in stages.
    Posted by BMWPartsDeal Specialist
    Q:
    What should be done after removing the vibration damper hub for the 2008 BMW X3? Posted by Customer
    A:
    Unscrew the plugs at the timing chain housing, remove the chain guide and tensioning rail mounting bolts, and use the special tool set to lock down the camshafts.
    Posted by BMWPartsDeal Specialist
    Q:
    What care should be taken when removing the primary camshaft chain tensioner for the 2002 BMW X5? Posted by Customer
    A:
    Care should be taken as the chain tensioner piston is under spring pressure.
    Posted by BMWPartsDeal Specialist
    Q:
    How should the oil pump sprocket retaining nut be tightened for the 2004 BMW Z4? Posted by Customer
    A:
    Remember to tighten the oil pump sprocket retaining nut to the specified torque.
    Posted by BMWPartsDeal Specialist
    If you have any questions about this product, please don't hesitate to ask us. We will be happy to help you!

Genuine BMW Part 11311432177, the Right Choice

To ensure reliability, purchase BMW part # 11311432177 Upper Engine Timing Chain. It is sometimes referred to as BMW Timing Chain. Genuine parts are first-rate in terms of quality and functionality. Manufactured directly by BMW, they undergo rigorous testing and are made from dependable materials to ensure long-lasting durability and dependability. This part fits 1996-2000 BMW 328i, 1995-1999 BMW M3, 2004-2006 BMW X3, 2001-2006 BMW X5.

BMWPartsDeal.com is a leading supplier of genuine BMW parts and accessories such as BMW 11-31-1-432-177 Upper Engine Timing Chain. In need of brand new OEM BMW parts? Feel free to browse through our extensive catalog of genuine BMW parts, all priced at the most competitive rates in the market. Furthermore, every part comes with a manufacturer's warranty and a hassle-free return policy for your convenience.

Why choose BMW Parts Deal

  • Dedicated Service

    Your complete satisfaction is our #1 goal

  • Lowest Prices

    Best deals on genuine OE parts from dealerships

  • Fast Delivery

    Orders are processed and delivered promptly